Triad Photography Guide

Thank you for partnering with Triad Vacation Rentals. We’re excited to work with you to capture the unique charm of our properties and create visuals that truly showcase the guest experience.
This guide is designed to help you understand our process and expectations from start to finish, ensuring consistency, quality, and smooth collaboration on every shoot.

Our photography standards focus on bright, well-lit, and realistic images that highlight each property’s best features and create an inviting atmosphere that encourages bookings.

Our goal is to make this process clear, efficient, and enjoyable for everyone involved. We truly appreciate your attention to detail and creativity in bringing each property to life. Please follow these guidelines when photographing Triad Vacation Rentals homes to ensure consistent, high-quality results.
We greatly appreciate your flexibility and collaboration during this process.
Our goal is to ensure every photo accurately represents the property and aligns with Triad’s brand standards for quality and presentation.
triad-cabin

Tropical Villa Retreat

number-of-guests
10
Guests
number-of-bedrooms
4
Bedrooms
number-of-bathrooms
3
Bathrooms
See Our Perfect Example
triad-managers

Mountain Retreat

number-of-guests
10
Guests
number-of-bedrooms
4
Bedrooms
number-of-bathrooms
3
Bathrooms
See Our Perfect Example
triad-management

Luxury Cabin

number-of-guests
10
Guests
number-of-bedrooms
4
Bedrooms
number-of-bathrooms
2
Bathrooms
See Our Perfect Example

Here’s a quick overview of
what this guide covers:

Recommended Photography
Equipment and General Guidelines

The tools and gear we suggest for achieving the best results.

Taking Photos

Guidance on how to approach composition, lighting, and capturing key details.

Editing & Post-Processing

Standards for post-production to ensure a polished yet natural look.

Feedback & Delivery

How we review photos and communicate any follow-up requests.

Recommended Photography Equipment
and General Guidelines

Before starting a photoshoot, it’s important to use the right equipment to ensure high-quality, professional results. Below is our list of recommended hardware for capturing both interior and exterior photos.

Cameras

We recommend using a professional DSLR or mirrorless camera capable of shooting in RAW format with a full-frame or APS-C sensor. Some excellent options include:
Canon, Nikon, Sony, etc. (Made after 2015)

Recommended lenses:

  • 12–35mm wide-angle lens (for interior shots)
  • 24–70mm standard lens (for general coverage)
Important: You must avoid using smartphones, point-and-shoot cameras, or any type of video camera for still photography. These do not provide the resolution, depth, or dynamic range required for our professional listings.

Camera Filters

CPL (Polarizer)
First impressions start before guests walk through the door. We showcase your property's exterior, landscaping, and outdoor spaces to set the right expectations.
ND (Neutral Density)
Reduces light, allows slower shutter/wider aperture. Use in bright daylight or for drone shots. Choose strength based on brightness (ND8–ND16 for strong sun).
GND (Graduated ND)
Balances bright sky vs dark landscape/interior. Place dark side over sky or bright window.
Pro Tips
  • Keep filters clean. Avoid stacking too many. Test on location; lighting changes effect.
  • CPL + ND combo works best through glass or bright windows.

Drones

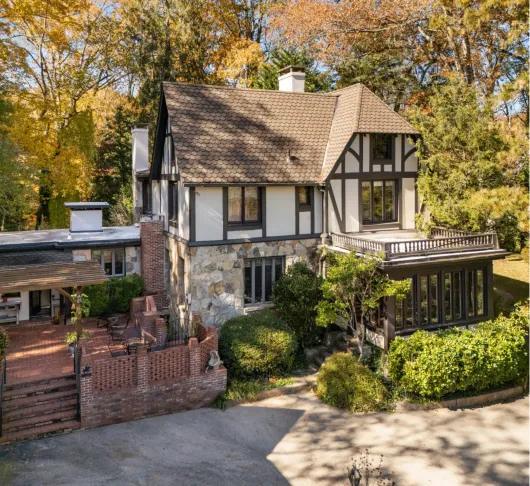
For aerial shots, use a drone capable of capturing high-resolution images (at least 20MP / 4K) and supporting manual camera settings. Recommended models include:

  • DJI Mavic 3 / Mavic 3 Pro, DJI Air 3, DJI Mini 4 Pro etc.

When possible, ensure the drone is FAA Part 107 certified and flown legally and safely in accordance with local regulations.

File Format

Always shoot in RAW format. We accept .CR2, .CR3, .NEF, .ARW, .RAF, .ORF, .PEF, .RW2, or .DNG - any standard RAW format that preserves full dynamic range and color data.

RAW files capture the full dynamic range and allow for precise adjustments during editing, ensuring clean, detailed, and true-to-life images.

Orientation

All photos must be shot in horizontal (landscape) orientation.

This format fits best across our marketing platforms, including Airbnb and Vrbo, and creates a cohesive, professional look.

Only take vertical shots if explicitly requested for detail or promotional use.

Lighting and Exposure

  • Use as much natural light as possible, and turn on all indoor lights to add warmth and brightness.
  • Avoid mixing strong daylight and artificial light that causes uneven color temperatures.
  • Plan your shoot for midday or early afternoon for balanced natural lighting unless the assignment calls for sunrise or twilight shots.
  • Use ND (Neutral Density) or UV filters on your lenses to reduce glare, manage exposure in bright conditions, and maintain color balance, especially for exterior or waterfront shots.

Composition

  • Frame images to show flow and connection between spaces, guests should feel like they can walk through the property.
  • Use a wide-angle lens (12–24mm range) for full-room coverage while keeping a realistic perspective. Avoid over-distortion.
  • Keep your camera height around 4–5 feet (1.2–1.5m) for interiors to ensure natural proportions.
  • Maintain straight vertical and horizontal lines, use a tripod and grid lines to align door frames, walls, and windows.

Staging Awareness

The owner is responsible for staging, but the photographer should make minor adjustments for presentation:

  • Straighten chairs, center rugs, align pillows, and smooth bedding.
  • Hide visible clutter, cords, trash bins, or cleaning supplies.
  • Open curtains and blinds to show exterior views and maximize light.
  • Turn off fans, TVs, and computer screens before shooting.

Key Amenities to Highlight

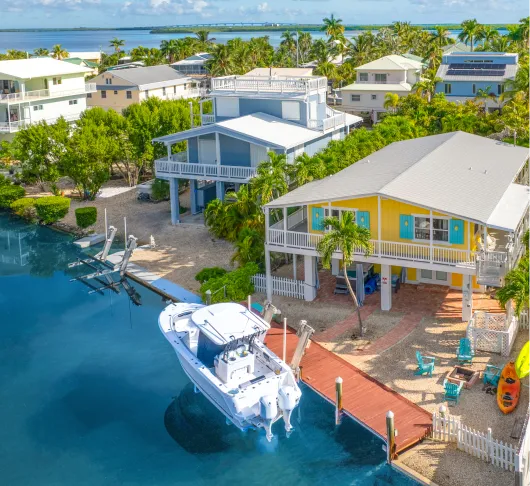
These are high-value features that strongly influence guest bookings and overall listing performance. If the property includes any of these amenities, make sure to capture clear, well-lit, and inviting photos that showcase their appeal and functionality.

Hot tub or private pool

Scenic view (lake, mountain, ocean, or city skyline, etc.)

Fire pit

Outdoor dining area with seating and grill

Fireplace (indoor or outdoor)

Unique feature or experience (game room, sauna, rooftop deck, or outdoor shower, etc.)

Hot coffee setup (espresso or Keurig with pods, etc.)

Patio or deck with lounge seating

General Tips

  • Keep a few neutral exposures for flexibility during editing.
  • Walk through the property before shooting to identify ideal angles and potential lighting challenges.
  • Take note of the sun’s position for exteriors to avoid overexposure or harsh shadows.

What Not to Do

  • Do not apply filters or heavy color grading - images should look bright, clean, and realistic.
  • Avoid overexposure, harsh HDR, or extreme contrast that distorts natural lighting.
  • Do not leave any clutter, covered furniture, or closed blinds in final shots.

Taking Photos

All Aeras Must Have

Wide Angles

Detail/Vignette Shots

3-8 photos

2-10 photos

Interior Spaces

Use two exposures when needed and merge them during editing to achieve balanced lighting.

Apply ND / UV filters if necessary, and use a polarizing filter to reduce glare and reflections (or correct them in post-processing).

It’s acceptable if a tripod or camera appears in a reflection temporarily, but it must be removed during post-processing.

Make sure all surfaces and mirrors are clean before shooting to avoid smudges or unwanted reflections.

Focus on both functionality and aesthetics, highlighting key features such as sinks, taps, showers, and tasteful décor details.

Pay close attention to lighting:

  • Prioritize natural light when available
  • Use appropriate artificial lighting when needed
  • Always ensure your lens is clean

People and animals are not allowed in final photos.
If they appear accidentally, they must be removed during editing.

Doors positioning:

  • Keep doors open for rooms and bathrooms
  • Keep doors closed for utility and service rooms

Important Shooting Rules
for a Interior Spaces

Windows:

  • The outside view must be visible, with no overexposure
  • Curtains & blinds: Always open for natural light

Wardrobes:

  • Take 2 extra photos: one open, one closed
  • Walk-in wardrobes count as separate rooms
  • Same photo set as regular rooms (wide + detail + lifestyle if staged)

Hallways are also considered separate rooms

See Our Perfect Example

Important Shooting Rules
for a Bathrooms

Use a wide-angle lens so the entire bathroom fits in the frame.

If the bathroom is too small to fit in a single shot, take multiple photos to capture the complete layout and decor.

You can use mirrors creatively to show more of the space..

See Our Perfect Example

Outdoor Spaces

*Special Areas

Focus on amenities
Highlight features like pool, hot tub, seating areas, garden decor, fire pits. Make sure all amenities  are uncovered and ready for shooting
Clean and stage
Remove clutter: toys, tools, garden equipment.
Angles matter
Capture the property from multiple perspectives: front, back, side, elevated angles.
See Our Perfect Example

Drones

Key Perspectives

Neighborhood Context
Show the property in relation to its surroundings (proximity to the beach, mountains, or local landmarks).
Top-Down (Bird’s Eye)
A direct overhead shot to clearly demonstrate property boundaries and the layout of the structures.
Hero Shot
A 45-degree angle capturing the main facade along with key outdoor amenities (pool, terrace, fire pit).
Compliance & Privacy
Follow all local drone regulations and "no-fly" zones. Avoid capturing neighbors' private spaces or faces in the frame.
Keep the horizon perfectly level.
See Our Perfect Example

Editing & Post-Processing

Exposure & Brightness

Avoid overexposure:

  • Use Lightroom or equivalent tools to check highlights and adjust exposure
  • Keep bright areas natural without losing detail

Even brightness:

  • Ensure no obvious dark spots or underexposed areas in any part of the image
  • Maintain consistency across all photos in the same set

Natural yet attractive:

  • Photos should look bright and inviting but avoid overly saturated or acidic colors

White Balance & Color

Neutral white balance:

  • All photos in a set should visually match in temperature and tint
  • Avoid unnatural warm or cool casts

Color corrections for specific elements:

  • Grass, bushes, trees: Photoshop to look lush and green
  • Water: Vibrant, realistic blue
  • Sky: Bright blue with soft clouds — avoid dull gray
  • Indoor windows: If the outdoor view is too dark or blown out, replace or enhance it to show clear, natural scenery

Cleaning & Object Removal

Remove debris and clutter:

  • Ensure no dirt, stains, or unwanted objects are visible

Reflections & glare:

  • Check mirrors, windows, and glass surfaces
  • Remove glare that interferes with seeing through the surface

People & animals:

  • None should appear in the final photo, only staged lifestyle props.
  • If captured, remove them during post-processing.

Important Editing Rules

Layer adjustments 
for tricky lighting

Combine multiple exposures if needed (HDR technique) for bright windows or dark interiors.

Enhance but 
don’t overdo

Keep textures and materials realistic.

Avoid making water, grass, or sky look artificial.

Check details 
at 100% zoom

Look for dust spots, lens flares, or imperfections that may be invisible at smaller resolutions.

Final review

Step back and compare the set as a whole.

Ensure all images tell a cohesive story, with consistent lighting, colors, and mood.

Feedback & Delivery

Once the photos are ready, please upload them in a format that allows us to review them before download. You can include a visible watermark or share a view-only gallery link (for example, via Dropbox, Pixieset, or Google Drive) as long as the images are fully viewable and reflect your final edits.

All images should be professionally edited for lighting, color correction, lens correction, and overall cleanup before sending them for review.

In addition to the edited photos, we also ask that you share the RAW files (.CR2, .ARW, .NEF, etc.) for our internal archive and backup.

After we receive the gallery, our interior designer will review the photos to ensure they meet our visual standards and capture the property’s best features. Based on this review:

If the photos meet our quality expectations:
we will move forward with completing payment.

If feedback or adjustments are needed: we will contact you with specific notes for additional edits before final approval.